


Winged Eyeliner Tutorial: Master the Perfect Flick

Winged eyeliner is a makeup technique that creates a lifted, elongated eye shape by extending liner beyond the outer corner in a precise upward flick. It is one of the most iconic looks in beauty history, rooted in the bold cat-eye styles of 1950s and 1960s screen sirens, and it remains just as relevant today. The good news is that this winged eyeliner tutorial breaks the whole process down into clear, manageable steps. Whether you are a complete beginner or someone who has tried and given up, you will find practical guidance here that actually works.
What Tools do I Need for a Winged Eyeliner Tutorial?
The right product makes an enormous difference to how easy the technique feels. Eyeliners fall into four main types, and each suits a different skill level and skin type.
Felt-tip pens are the most beginner-friendly option. They offer a consistent ink flow, dry quickly, and give you the kind of control that liquid liners in a pot simply cannot match for newcomers. Liquid liners with a fine brush tip deliver the sharpest lines but demand a steadier hand. Gel liners sit in a small pot and require an angled brush; they are slower to dry, which gives you time to adjust, and they are particularly well suited to mature skin because they resist feathering into fine lines. Pencil liners are the most forgiving of all, though they rarely produce the crisp edge that defines a classic wing.

Beyond the liner itself, you need a few supporting tools:
An angled eyeliner brush (for gel liner or for sketching with dark eyeshadow)
Cotton buds for blending and cleaning up edges
A flat concealer brush for precise corrections
Full-coverage concealer to sharpen the wing outline
Eye primer or a light concealer to prep the lid
Liner type | Control | Dry time | Best suited to |
Felt-tip pen | High | Fast | Beginners |
Liquid liner | Very high | Fast | Intermediate to advanced |
Gel liner | Medium | Slow | Mature skin, precise work |
Pencil liner | Low | N/A | Soft, smudged styles |
Pro Tip: If you are just starting out, buy a felt-tip pen liner with a fine tip rather than a brush-tip liquid liner. The rigid felt nib gives you far more control on your first attempts.
How to Do Winged Eyeliner: Step by Step
Good preparation is the foundation of any long-lasting wing. Eye primer or concealer, set lightly with a translucent powder, stops the liner sliding or smudging throughout the day. Apply it to the lid, let it sit for around 30 seconds, and then you are ready to start.
Step 1: Map the wing angle
Sit in front of a well-lit mirror and look straight ahead with your eyes open. Drawing with eyes open lets you map the wing according to your natural eyelid fold, which is the position that actually matters. Imagine a line extending from your lower lash line outward and upward toward the tail of your brow. That imaginary line is your wing angle. The wing should follow this direction rather than curving upward along the top lid, which creates a drooping effect.
Step 2: Sketch the wing outline
Place a small dot at the outer corner of your eye to mark where the wing tip will sit.
Draw a second dot slightly inward along the upper lash line to indicate the wing’s base.
Connect the two dots with a thin diagonal line to form the upper edge of the wing.
Draw a second line from the tip back down to meet the lash line, creating a hollow triangle shape.

This is the dot-and-connect method, and it is one of the most reliable approaches for building symmetry before you commit to a full line. Using an angled brush with dark eyeshadow to sketch this outline first means any errors wipe away easily.
Step 3: Fill in the wing, then line the lash line
Fill the hollow triangle with short, feather-like strokes rather than one long drag. Drawing the wing first and then connecting it to the lash line prevents the liner from becoming accidentally thick or uneven at the outer corner. Work from the outer corner inward along the upper lash line, keeping the line thin at the inner corner and gradually thickening it as you move outward.
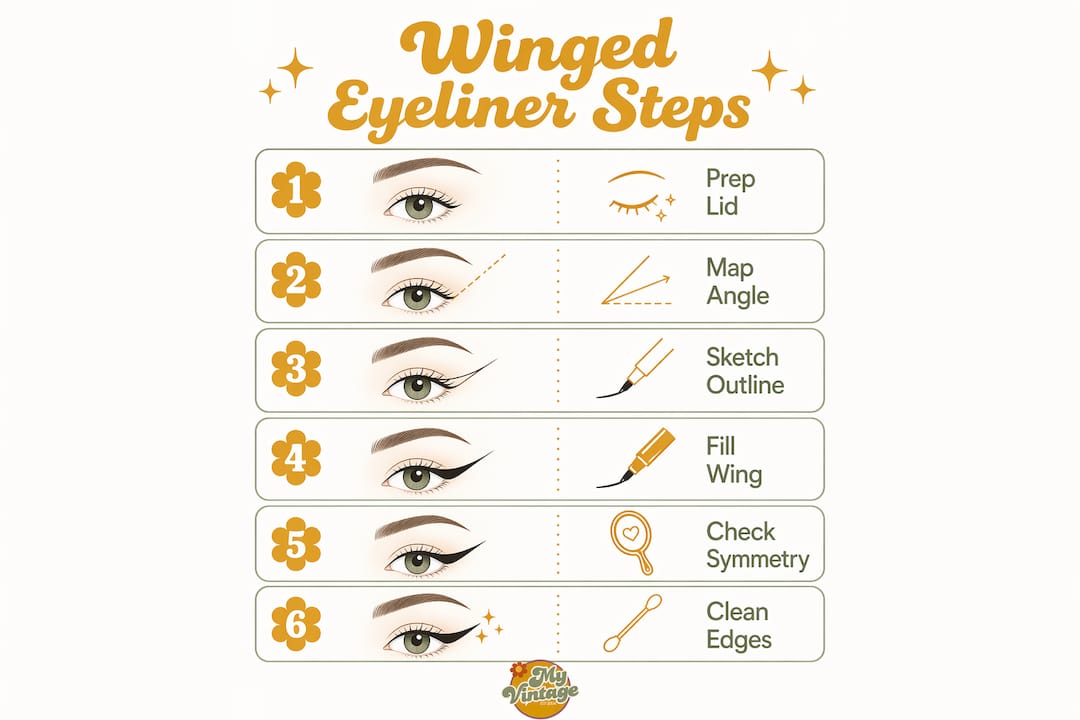
Step 4: Check symmetry and clean the edges
Step back from the mirror and compare both eyes with a relaxed, open expression. Balanced wings are more flattering than identical ones, because natural facial asymmetry means perfect mirroring is neither realistic nor necessary. Use a flat concealer brush loaded with full-coverage concealer to sharpen the wing edges rather than wiping mistakes away with micellar water, which can disturb your base makeup.
Pro Tip: Rest your elbow on a hard surface while applying liner to steady your hand. Start on your less dominant eye first, when your hand is freshest and most controlled.
How do different eye shapes change the wing?
Winged liner flatters every eye shape, but the placement and angle need adjusting to suit your individual features. Here is how to adapt the technique:

Hooded eyes: Draw the wing with your eyes open and looking straight ahead. The fold of the hood will cover any liner placed on the mobile lid when eyes are open, so the wing tip needs to sit just above the crease line to remain visible.
Downturned eyes: Angle the wing more steeply upward than you think necessary. A subtle upward lift at the outer corner counteracts the natural downward tilt and creates a brightening effect.
Monolid eyes: Keep the wing thin along the lash line and extend the tip outward rather than sharply upward. A longer, lower-angled flick suits the flatter lid surface beautifully.
Mature skin: Gel liner or pencil resists feathering into fine lines far better than liquid liner. Avoid stretching the skin during application, as pulling the eyelid distorts the wing shape once the skin relaxes back into place.
The 1950s makeup era is the original reference point for the cat-eye wing, and studying those iconic looks reveals just how adaptable the technique has always been. Audrey Hepburn wore a long, graphic flick; Sophia Loren favoured a thicker, more dramatic line. Both approaches work because the angle and proportion were matched to their individual eye shapes.

What are the most common winged eyeliner mistakes to avoid?
Most problems with winged eyeliner come down to a handful of fixable habits. Knowing what to watch for saves a great deal of frustration.
Uneven wings are the most common complaint. The fix is to draw both wing tips before lining the lash line, then step back and compare angles from a distance. Correcting the tips at this stage is far easier than trying to adjust a fully completed look.
Shaky lines happen when you try to draw the wing in one single stroke. Use the dot-and-connect method instead, building the shape from small connected marks. Short strokes give you far more control than one long pull across the lid.

Smudging and transfer usually point to inadequate lid preparation. A good eye primer or a light layer of concealer set with translucent powder creates a dry, grippy surface that holds liner in place. A dusting of matte eyeshadow over the finished wing also locks it down and reduces shine.
Avoid stretching the eyelid skin during application; work with relaxed skin for a true wing shape.
Do not line the inner corner thickly before completing the wing, as this makes the liner look heavy and unbalanced.
Clean up mistakes with a flat concealer brush rather than a cotton bud dipped in micellar water, which can smear surrounding foundation.
Check the finished look with both eyes open and your face relaxed, not with one eye squinting at a mirror.
The makeup through the decades shows that even professional makeup artists working on film sets rely on correction and refinement rather than perfection on the first stroke. The technique has always been iterative.
Pro Tip: If your wings never seem to match, photograph your face straight on after completing the look. The camera captures symmetry more objectively than a mirror, and you will spot the difference in angle far more easily.
Key Takeaways
Winged eyeliner requires proper lid preparation, a mapped wing angle, and short feather-like strokes to build a balanced, flattering flick that suits any eye shape.
Point | Details |
Prep the lid first | Apply eye primer or concealer set with powder to prevent smudging and extend wear. |
Map before you draw | Use the dot-and-connect method to sketch the wing outline before committing with liner. |
Draw wing before lash line | Completing the wing tip first prevents over-thickening and keeps proportions balanced. |
Adapt for your eye shape | Adjust the wing angle and length to suit hooded, downturned, monolid, or mature eyes. |
Correct with concealer | Use a flat brush and full-coverage concealer to sharpen edges without disturbing base makeup. |
FAQ
What is the easiest eyeliner type for beginners?
A felt-tip pen liner is the easiest option for beginners. The rigid nib provides consistent ink flow and control, making it far simpler to manage than a brush-tip liquid liner.
How do I stop my winged eyeliner from smudging?
Apply an eye primer or light concealer to the lid and set it with translucent powder before lining. A dusting of matte eyeshadow over the finished wing locks it in place throughout the day.
Should I draw winged eyeliner with my eyes open or closed?
Always draw with your eyes open and looking straight ahead. Applying liner with eyes closed or looking down produces a shape that appears distorted once your eyes are open.
How do I fix uneven wings?
Draw both wing tips first before lining the lash line, then step back and compare angles from a distance. Use a flat concealer brush with full-coverage concealer to adjust the shape of whichever wing needs correcting.
Does winged eyeliner suit mature skin?
Winged liner suits all ages when the right formula is chosen. Gel liner or pencil liner works best on mature skin because it resists feathering into fine lines better than liquid liner.
Recommended


Comments